Hello! Greetings from WebVista.
This is a complete overview of our video tutorial.
In this tutorial we will show you how to install Siberian CMS.
As per Siberian server requirements, we have used Contabo VPS, Debian 9 and VestaCP in this tutorial.
Step-1: Download your Siberian edition SAE/MAE/PE from the official Siberian CMS website.
Step-2: Purchase your server. Contabo & OVH servers are the most recommended servers for Siberian CMS.
FYI: In this tutorial we have used Contabo VPS S SSD which offers 4 vCPU Cores, 8 GB RAM & 200 GB SSD. After server purchase, Contabo will ask you for document verification by an email. Just send them your ID proofs and within one or few hours your server will be ready and you will receive an email regarding your server login data.
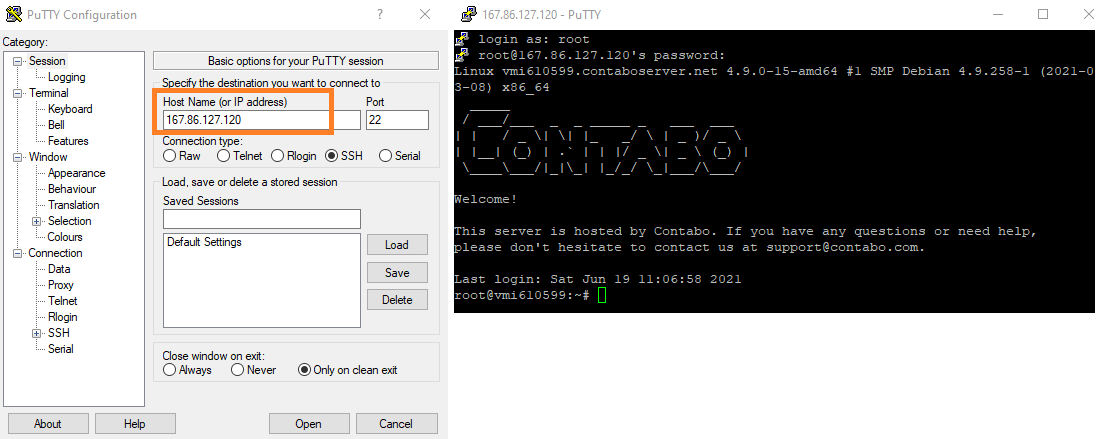
Step-3: SSH connection. To connect in SSH, windows users can use Putty and Mac users can use the Terminal application that is already installed on MacOS.
For Windows: Open Putty and put your server IP address in the hostname field, select SSH as a connection type and click on Open.
Now type your username (root) where it says login as. Now it will ask you to enter your server root password. Type it or paste it there using right click and then press enter.
Note: You will not get any feedback on the screen while typing.
For Mac: ssh username@server-ip
We have used mac in this tutorial so we will use ssh root@167.86.127.120
You will see a welcome screen after successfully login. For more info regarding connect in SSH click here.
Step-3: Install VestaCP as a server control panel.
First install Curl (which is a command-line utility for transferring data from or to a remote server, we’ll require it to install VestaCP) by running below command:
apt install curl
Whenever it asks for “Do you want to continue?” Type y and press enter.
Run below two commands in SSH one by one as shown in the video.
curl -O http://vestacp.com/pub/vst-install.sh
bash vst-install.sh
Now you’ll see vesta text art and it will ask you “Would you like to continue?” Type y and press enter.
Now type your email address and press enter.
Now type your hostname there and press enter.
Now it will take 10-15 minutes to install and whenever it gets completed you’ll see congratulations screen with vesta text art. Here you’ll also find VestaCP login url with username & password. You will also get it by an email so no need to copy it from there.
Now you can close the SSH connection. To do so type exit and press enter.
Step-4: Create a FTP account.
Note: In this tutorial, we have shown you how to install Siberian CMS on main host url, but you want to install it on your own domain or sub-domain. So in this case, you have to create a web space as shown here. After that…
Login to your VestaCP and click on Web > Your domain [EDIT]
Here at last, tick mark the Additional FTP. Fill your FTP username & password.
Step-5: Upload index.php file using FTP.
Unzip index.php file from your downloaded Siberian SAE/MAE/PE zip file.
Connect to your server FTP using any FTP software. Here we have used FileZilla.
You can use your server hostname or IP address in the Host field and use username & password which you’ve just created in the step-4. Leave the port field as it is and click on Quick connect.
Now on the right side your server’s files will be displayed. Click on “public_html“. Here Delete the files in the folder “public_html”.
Now on the left side (which are folders & files of your computer) find your index.php file (which you’ve just unzipped in the step-5) and drag it and drop it to the right side “public_html” folder.
Now when you visit your host url in the browser, you’ll see siberian Download & install screen.
Step-6: PHP Settings. Now in your VestaCP panel click on “Server” > apache2 (web server) > Configure > CONFIGURE PHP.INI
Here set below values:
- max_execution_time: 300
- max_input_time: 300
- memory_limit: 512M
- post_max_size: 100M
- upload_max_filesize: 100M
And then click on “Save” button.
Step-6: Now open your host / domain url in the browser and click on “Download & Install” button.
Note: If you have MAE/PE then you’ll be asked to enter your license key and your license key will be mapped with this host / domain url. So it’s always better to install Siberian MAE/PE on your own domain / sub-domain instead of a default host url. To do so, just create a web space in the VestaCP as shown here.
Step-7: After completion of a download, Siberian Welcome screen will be displayed. Click on Next button and now Accept terms & conditions and click on Next button.
Step-8: Now a Database screen will be displayed, fill localhost as a host.
Now create a database in a VestaCP.
To create a database in a VestaCP, click on a “DB” > ADD DATABSE.
Type your database name, username, password and click on Add button and then fill your database name, username and password in a Siberian Database screen and then click on a Next button.
Step-9: Now Installation will be started and it will take few minutes to complete. Then after Admin screen will be displayed type your email and password there.
Step-10: Now Application screen will be displayed and type your app name there and click on a Next button.
That’s it. You’ve successfully installed Siberian CMS.
Click on a Next button to launch your Siberian Backoffice. Here login with your email & password which you’ve just created in the Step-9 Admin screen.
Useful links:
- Siberian server requirements: https://doc.siberiancms.com/knowledge-base/siberian-server-requirements/
- How to install Siberian in VestaCP: https://doc.siberiancms.com/knowledge-base/how-to-install-siberian-in-vestacp/
- How to install Siberian SAE: https://doc.siberiancms.com/knowledge-base/how-to-install-siberian-sae/
- How to install Siberian with Plesk: https://doc.siberiancms.com/knowledge-base/install-siberian-plesk/
- How to install Siberian with WHM/cPanel: https://doc.siberiancms.com/knowledge-base/install-siberian-whm-cpanel/
- How to set up your Siberian: https://doc.siberiancms.com/knowledge-base/how-to-set-up-your-siberian/